Tutorial #1: Basics
This tutorial shows how to:
Get a web application up and running
Using included widgets
Using default styles and behaviors
Having a single application in the server
For this we will build a simple To-Do application.
Skeleton
The code shown below is the minimum necessary to start a Jibe application and server:
from jibe import MainApp

class ToDoApp(MainApp):
    pass

if __name__ == "__main__":
    ToDoApp.run(port=8881)
Save it as todo.py and run it in the terminal:
python todo.py
Then launch your web browser and navigate to localhost:8881.
You should get a blank page (Our Jibe application is completely empty at this stage).
Structure
The sketch below shows what we want to achieve:
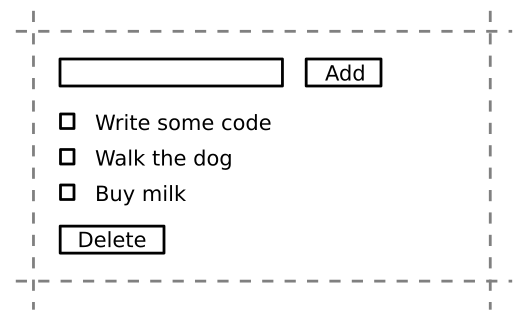
We simply want a text input with a button that allows us to enter new tasks, which get listed below. Each task will have a checkbox that allows us to select which tasks we want to remove when we click on the Delete button at the bottom.
Since Jibe applications are structured as widgets within widgets, we just need to identify which ones we need, which ones are built-in and which ones we will have to code:
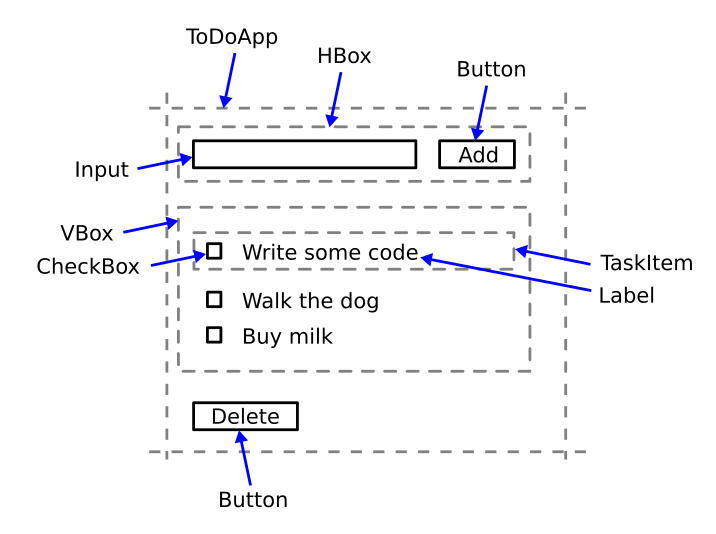
Each label in the figure is a widget class, this is, classes that inherit from the class Widget.
Out of those, the ones that are built in are:
HBoxVBoxInputButtonCheckBoxLabel
The ones that we need to code are:
ToDoAppTaskItem
These two are simply widget containers, and will contain existing widget.
Our First Widget
Let’s create the TaskItem widget:
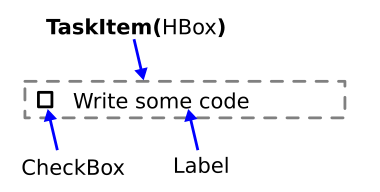
This its implementation:
class TaskItem(HBox):

    def __init__(self, text, *args, **kwargs):
        super().__init__(*args, **kwargs)

        self.label = Label(text)
        self.chk = CheckBox()

        self.children = [self.label, self.chk]
This widget (and any widget) is created by subclassing
another widget, an HBox in this case.
The HBox is a container that positions the widgets
inside (its children) side by side.
In object orienter jargon we saya TaskItem is a
HBox. We will have multiple instances of TaskItem,
therefore it is conveninent to create a class for it
instead of managing the HBox, the Label and
the Checkbox independently every time we add a new task.
Composition of the App
Now we will complete the structure of the ToDo application:
from jibe import MainApp, Input, Button, HBox, VBox


class ToDoApp(MainApp):
    def __init__(self, *args, **kwargs):
        super().__init__(*args, **kwargs)

        self.input = Input()
        self.add = Button('Add')
        self.taskentry = HBox()
        self.taskentry.children = [
            self.input, self.add
        ]

        self.tasksarea = VBox()
        self.delete = Button('Delete')

        self.children = [
            self.taskentry,
            self.tasksarea,
            self.delete
        ]


if __name__ == "__main__":
    ToDoApp.run(port=8881)
The changes we have made to our initial version are:
Created the constructor
__init__.Called the parent’s constructor
super().__init__(). This is important. Since we are overriding the constructor, we need to make sure that the constructor ofMainAppis started, which takes care of setting up the application. In general, it is better if this is the first thing you do in your constructor.Created instances of basic widgets,
self.inputis a text input,self.addis the “Add” button, andself.deleteis the “Delete” button. We are saving these in local variables since we will need them later.Created instances of container widgets,
self.taskentryto holdself.inputandself.addarranged horizontally (HBox), andself.tasksareato hold the instances ofTaskItemvertically (VBox) later on.Assigned the
childrenvariables of the different container widgets with alistof widgets. Thechildrenvariable is a special variable in widgets. As soon as you assign to it or change it, it will update the corresponding children in the browser.
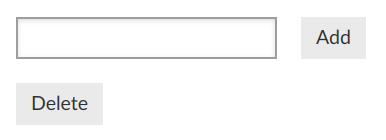
This is what you should get in the browser:
Interactivity
So far our application does nothing. But all our visual structure is in place and we can start adding interactivity. We do this by specifying callbacks to events that occur in the widgets.
Let’s start with the “click” event on the “Add” button. For this we need two things: A method that specifies what we want to do when a “click” happends, and to attack this method the the button’s “click” event.
We will add this method to the ToDoApp:
def on_add(self, source, message):

    self.tasksarea.children.append(
        TaskItem(self.input.value)
    )
It creates a new TaskItem with the value of self.input,
and the appends it to the children of self.tasksarea.
And in the constructor, connect this method to the event with this line:
self.add.register("click", self.on_add)
Remember to include the definition of TaskItem in todo.py.
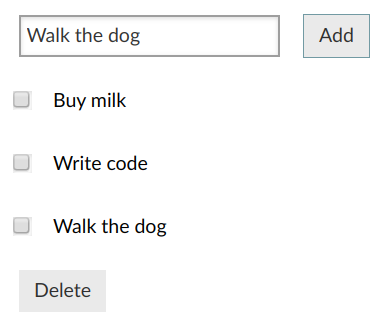
Finally, run the program again and add some tasks by typing them in the input box and clicking on “Add”. It should look like this:
The last thing we need to implement is the removal of checked items. Again, we create a method to implement the action, and we connect it to the event:
def on_delete(self, source, message):

    self.tasksarea.children = [
        item for item in self.tasksarea.children
        if not item.chk.checked
    ]
And connect it to the event in the constructor with:
self.delete.register("click", self.on_delete)
You may now restart your application and try addind and then removing some tasks.
This completes our simple but fully-functional example.